
Two of the officers of LiNK had birthdays in the same week, but craziness from school also came during that same week. So, I did my best to make up for it with a belated surprise cake. I do wonder if I'm going to be able to keep being able to surprise my friends with cakes after awhile, since me showing up to a gathering with the birthday boy/girl present usually means I'm accompanied with cake. :p Then again, cake doesn't really have to come as a surprise, but I guess I'll just never outgrow loving the excitement of surprises in general.

I've been noticing that I keep losing the recipes for the stuff I bake, so I really need to stay on top of updating this blog with what I bake in order to save time for future baking adventures.
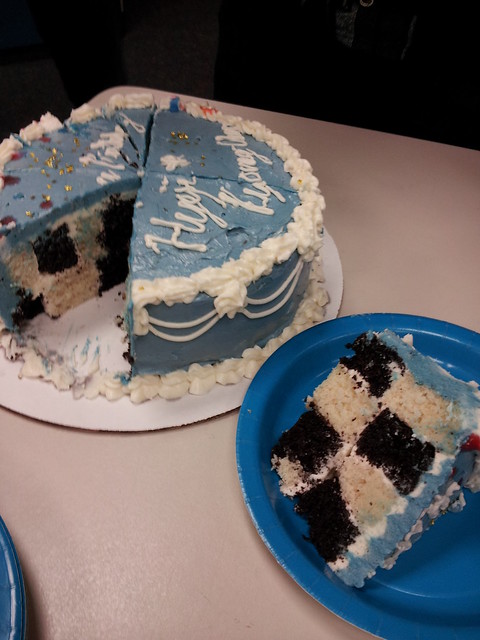
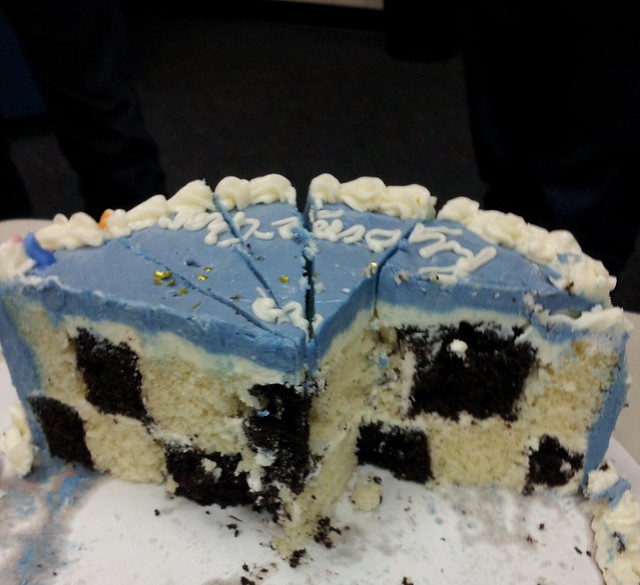
Anyways, back to cake. After seeing this tutorial from the source of seemingly endless creativity and inspiration, the I am Baker blog, I've been itching to try baking something with a re-designed interior. I didn't have time to fuse the two layers to make a vertical layer cake (will try next time!) and I figured two 2-layer cakes would be a bit too much... so I went for making a checkerboard cake! I worried about the harmony of the two types of cake, but luckily, both the white cake and chocolate cake were wonderfully fluffy with a tight crumb. Although the white cake was a tad bit denser than the chocolate cake, I found that the checkerboard design really married the two flavors and let them complement each other beautifully.
Lastly, I fell in love with the smooth consistency and fluffy, light texture of swiss-meringue buttercream when I made this cake last March for my soon sister, Cathy. So, I knew that it would be the perfect frosting for this checkerboard cake: lending a creamy, sweet finish, but not fighting for the center of attention.
White Cake Recipe derived from blog, Sweetapolita
one 1-layer, 8-inch round
Ingredients:
2.5 large egg whites
3/8 cup milk
1 tsp vanilla extract
1_1/4 cups cake flour
7/8 cups sugar
1/2 TB + 1/2 tsp baking powder
1/2 tsp salt
6 Tb Unsalted Butter (cubed, room temperature)
1.) Preheat oven to 350 degrees. Prepare one 8-inch round cake pan by greasing, flouring and lining the pan with parchment paper (makes removal much much easier!)
2.) Combine dry ingredients and whisk to distribute evenly.
3.) Add butter and 1/2 cup milk to dry ingredients. Whisk together on low speed until just combined (about 30 seconds), then increase to medium speed and mix for 1 and 1/2 minutes.
4.) In a separate bowl, lightly whisk egg whites, 1/4 cup of milk and vanilla extract.
5.) Add egg mixture to other ingredients in three batches, beating on medium speed for 20 seconds after each addition.
6.) Pour batter into prepared pan.
7.) Bake for 25-35 minutes or until cake tester comes clean when inserted into the center. Let cool on racks for 10 minutes before removing cake from pan. Cake is good at room temperature for two days, refrigerated for 5 days, or frozen for up to 2 months.
Devil's Food Cake
For 1 8-inch Cake
Ingredients
2/3 cups all purpose flour
1/2 tsp Baking soda
1/4 tsp salt
1/2 cup dark brown sugar
1/4 cup granulated sugar
1 egg white and 1 egg yolk
1/2 tsp vanilla extract
1/2 ounce of chocolate
1/4 cup cocoa powder
1/3 cup hot coffee
1/6 cup milk
Directions
1.) Preheat Oven to 325 degrees. Grease, flour and line the bottom of a 1 8-inch cake pan with parchment paper.
2.) Beat Butter and sugars on medium speed until fluffy for three minutes. Add the eggs and beat well after adding. Add vanilla. Scape down bowl and mix for 30 seconds.
3.) In bowl #2, sift all purpose flour, baking soda and salt together
4.) In bowl #3 (a microwave-safe bowl), add chocolate and cocoa powder. Pour hot coffee over chocolate/ cocoa powder mixture and whisk til smooth. Then pour milk over the mixture and mix until smooth.
5.) Add 1/3 flour mixture to bowl (of sugar and butter), then add half of the chocolate mixture. Alternate flour and chocolate mixture mixing well after each addition.
6.) Pour batter into prepared pan and bake for 35-40 minutes. Test if it is done by inserting a toothpick in the center of the cake, if it comes out clean or with a crumb or two, it is done! Let cool on racks
Swiss Meringue Buttercream
Makes 5 cups.
From Sweetapolita. Check out her awesome detailed tutorial here!
Ingredients:
5 large egg whites
1 cup + 2 Tb Granulated Sugar
4 sticks unsalted butter (cubed, room temperature)
2 tsp vanilla extract
pinch of salt
Directions:
1.) In a clean and dry bowl, add egg whites and sugar.
2.) Place bowl over a pan of simmering water (make sure bottom of bowl doesn't touch the water!) and whisk constantly until mixture reaches 140 degrees Fahrenheit (this is when the sugar has all dissolved and the egg whites are hot). If not working with a candy thermometer, check by rubbing mixture between fingers; you should not feel any granules.
3.) Using a stand or hand mixture, whip mixture on high until mixture is completely cooled and forms stiff, glossy peaks (about 10 minutes).
4.) Add butter cubes, one at a time and beat until incorporated after each addition.
5.) Add vanilla and beat to incorporate.
6.) Using the paddle attachment of the stand mixer, beat on lowest speed for 5 minutes (this eliminates air bubbles).
7.) Use immediately or store in an airtight container in the refrigerator for up to 3 days or frozen for up to 6-8 weeks. If placed in refrigerator, let come to room temperature and rewhip for 5 minutes.
8.) Color as desired. I used a good bit of Wilton Cornflower blue coloring and 3 drops of Americolor light blue.
Checkerboard Cake Assembly
1.) Trim edges of white and chocolate cake and level cakes.
2.) Place cake layers on top of each other. Align and trim edges.
3.) Using a serrated knife, cut three circumferences, yielding 4 rings of cake. Separate cake layers. Place cakes in the freezer to firm up the cake for better handling.
4.) Cut a radius into the cake and carefully peel out alternating rings of the cake (i.e. remove the innermost and 3rd ring of the white cake and vice versa for the chocolate cake.)
5.) Line inner layers of rings with buttercream and piece together a cake with alternating patterns of rings. Level the cake again as needed.
6.) Coat the top and sides of each layer of the cake before placing the layers into the freezer.
7.) Place the layers on top of each other and crumb coat the cake with the buttercream.
8.) Decorate as you wish!
Aftermath
No comments:
Post a Comment